这里记录一下离线部署量化后的大模型。负载均衡和生产级部署放在其他文章里。
目前有一台有显卡的主机,打算部署稍大参数的模型;有一台日常用的macbookpro,打算部署一个轻量的量化后的gguf格式的模型;另外还有一些小设备,打算只有玩玩更小的模型比如qwen3.5-0.8b的,离线部署边缘计算。
目的很简单,就是瞎折腾。公司里不允许私自搭建部署,只能使用copilot,虽然能使用一些比较好的模型比如claude最新的模型,也能用cli,但是不开放api。自己有一些想法想尝试一下,需要特化的模型,但私人的设备也仅仅能对参数量少的模型做,同时也玩玩初级的具身智能,搞点玩具。
需要多模态的模型,文本、语音、视觉,打算选择qwen3.5的模型。https://modelscope.cn/organization/qwen?tab=model
这里会记录cli、server、web代理、open-webui,守护进程,api请求单轮多轮流式、持久化存储。
先从无显卡的mbp开始,首先需要llama.cpp,在其github中有不少的文档:https://github.com/ggml-org/llama.cpp/tree/master/docs
(也有ollma和llama-cpp-python可以用。llama.cpp可以当做原生,性能最好,维护更新很快;llama-cpp-python是python封装但可以把模型当作普通 Python 对象直接调用,省掉序列化开销,调试也方便;ollama则是产品化封装,提供很多方便快捷的使用方式)
(对于正儿八经的服务器级别和生产级显卡,则使用vllm,对于显存利用、高并发等情况是首选,它不是用gguf这种而是safetensors这种格式了)
可以从git拉取后cmake
brew install cmake
git clone https://github.com/ggml-org/llama.cpp.git
cd llama.cpp

cmake -B build -DGGML_CUDA=OFF
cmake --build build --config Release -j
或者直接用brew装
brew install llama.cpp
从modelscope下载qwen3.5-4b的量化模型文件,选择Qwen3.5-4B-Q5_K_M.ggufGGUF https://modelscope.cn/models/unsloth/Qwen3.5-4B-GGUF/files
先试试启动对话模式llama-cli,运行这个命令
llama-cli \
-m models/Qwen3.5-4B-Q4_K_M.gguf \
-c 8192 \        # 上下文窗口大小(token数)
-t 4 \           # CPU线程数
-cnv \           # 对话模式开关,否则是单轮问答模式
--temp 0.7 \     # 控制输出随机性(0.0 = 完全确定性;1.0 = 标准;>1.0 = 更发散。代码生成建议 0.1-0.3,创意写作 0.7-1.0)
--jinja \        # 使用模型内置的 Jinja2 聊天模板
--chat-template-kwargs '{"enable_thinking":false}'   # 控制推理过程,是否先思考再回答

###其他一些可用参数是:
--top-p 0.8 \                    # 核采样:只在概率前80%的token中选,减少低概率胡言
--top-k 20 \                     # Top-K采样:只在概率最高的20个token中选
--repeat-penalty 1.1 \           # 重复惩罚:对已出现的token施加1.1倍惩罚,缓解小模型"复读机"问题
--repeat-last-n 512 \            # 只对最近512个token施加重复惩罚(默认64太小)
--min-p 0.05 \                   # 最低概率阈值:概率低于5%的token直接不考虑
--seed 42 \                      # 固定随机种子,让相同输入产生相同输出(便于复现)
-n 1024 \                        # 每次最多生成1024个token(-1=不限制)
--color \                        # 彩色输出(用户输入和模型输出不同颜色)
--system-prompt-file system.txt \# 从文件加载system prompt
--multiline-input                # 允许多行输入(按空行+Ctrl+D提交)
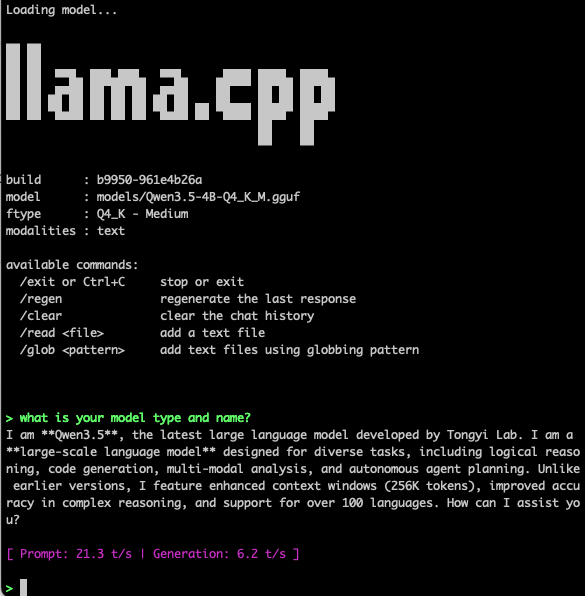
此时稍等小会,我这16g的老mbp用起来都还算流畅。然后看到了llama的文字,以及对话的光标,可以开始进行问答,如下图
也可以启动一个带有简易界面的llama server,类似于使用ds或glm之类的在线版,不过这电脑的回复没有那么快,虽然也能接受。毕竟性能还是不太够,之后会用有显卡的主机来做。
运行命令
llama-server \
-m models/Qwen3.5-4B-Q4_K_M.gguf \
--host 0.0.0.0 \
--port 8080 \
-c 8192 \
-t 4 \
--jinja \
--cache-type-k q8_0 \  # KV缓存是注意力机制中存储历史token计算的内存。默认f16(16位浮点),量化为q8_0 可节省约50%内存,精度损失极小。也可以设q4_0更省但精度损失更大
--cache-type-v q8_0

####其他一些可用参数是:
--api-key "my-secret-key" \          # 设置API密钥,防止未授权访问(对外暴露时必须设)
--np 4 \                              # 并行slot数:同时处理4个请求(默认1)
--cont-batching \                     # 连续批处理:新请求不必等前一个完成
--metrics \                           # 开启Prometheus指标端点(/metrics)
--embeddings \                        # 开启embedding API(/v1/embeddings),用于RAG
--ssl-cert-file cert.pem \            # 启用HTTPS
--ssl-key-file key.pem \
--system-prompt-file system.txt \     # 预加载system prompt到所有对话
--log-format json \                   # 日志输出为JSON格式(方便收集)
--alias "qwen3.5-4b"                  # 在API中显示的模型别名
可以上传文件,可以添加mcp server,如下图
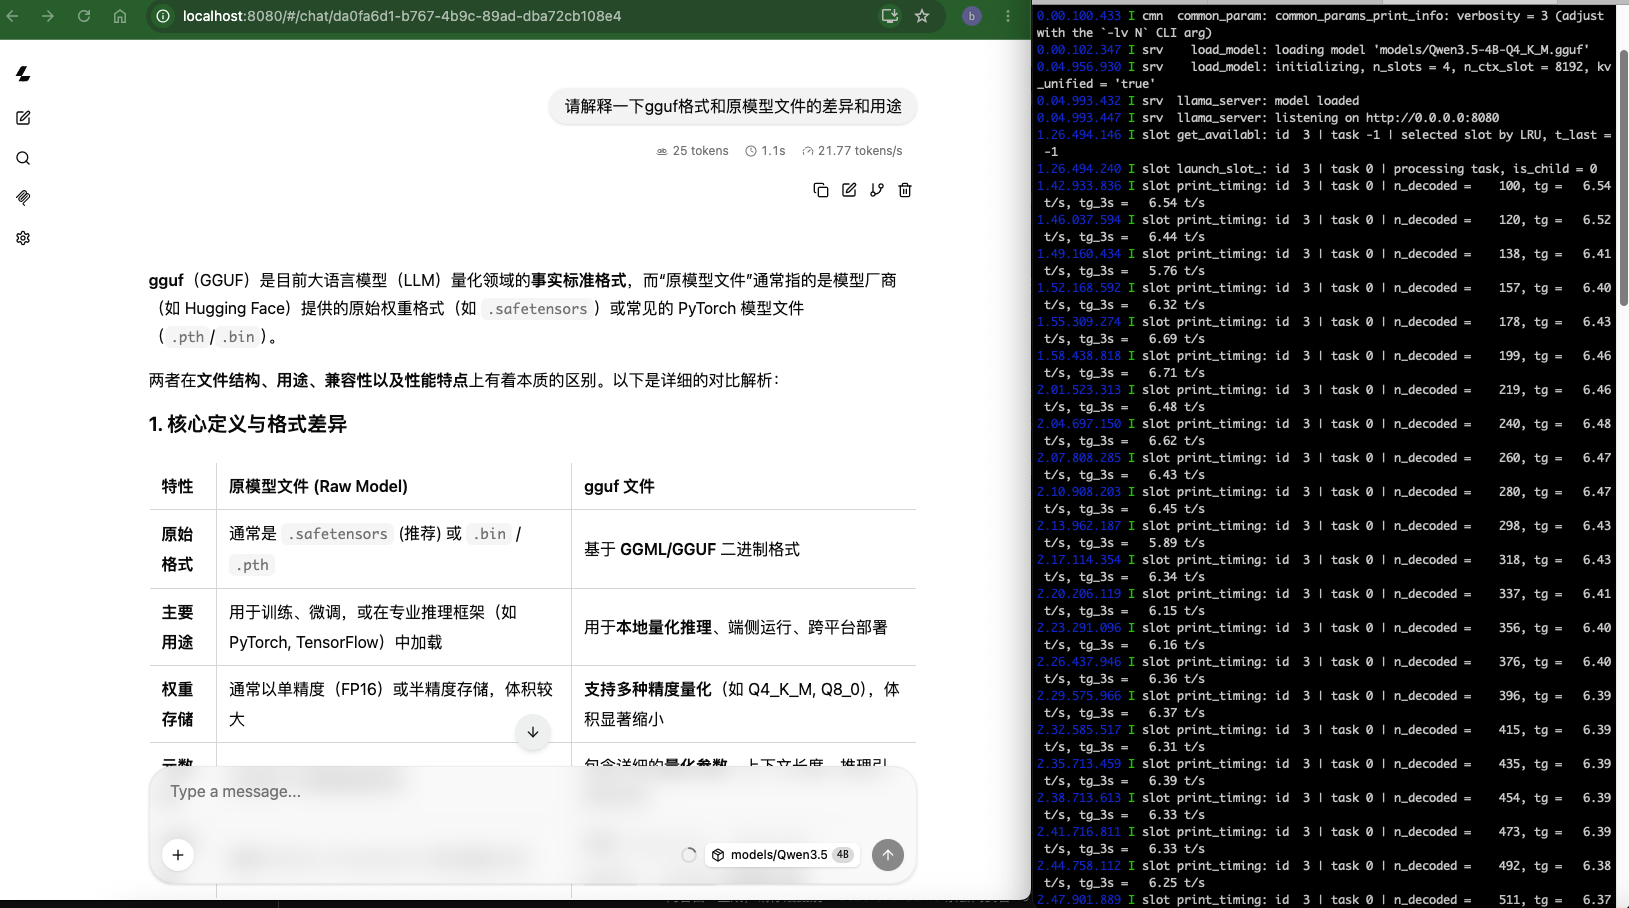
需要注意的是,虽然3.5-4b这个模型被标注为视觉多模态,但是此时会发现上传image和video的选项是灰显的,只能上传text和pdf,这是因为还需要mmproj文件。
此时再去下载一份mmproj-BF16.gguf文件,并且在运行命令中加一个参数:--mmproj models/mmproj-BF16.gguf \
重新启动后便能上传图片和视频了,如下图:
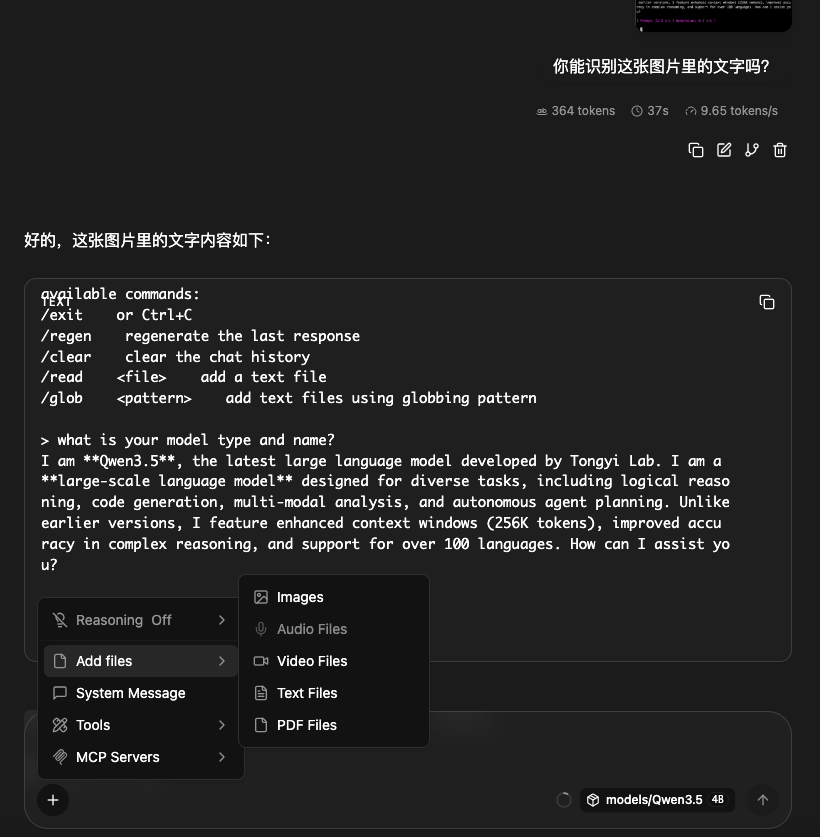
其实简单文字识别还不错,只是响应明显比纯文字慢,毕竟消耗更多的token。
llama server本身其实就是一个http server了,不过自带界面比较简陋,这里换成open-webui。
我这是个老的intel cpu的mbp,使用uv安装时,uv add open-webui时会报错:hint: You're on macOS (macosx_15_0_x86_64), but onnxruntime (v1.26.0) only has wheels for the following platforms: manylinux_2_27_aarch64, manylinux_2_27_x86_64, manylinux_2_28_aarch64, manylinux_2_28_x86_64, macosx_14_0_arm64, win_amd64, win_arm64; consider adding "sys_platform == 'darwin' and platform_machine == 'x86_64'" to tool.uv.required-environments to ensure uv resolves to a version with compatible wheels.
于是简单点,只用用pip install open-webui安装。装了一大堆东西后,启动llama server,再运行open-webui
echo 'export HF_ENDPOINT=https://hf-mirror.com' >> ~/.bash_profile  # 如果遇到提示访问huggingface的链接问题
source ~/.bash_profile
open-webui serve --port 3000
然后访问http://localhost:3000/,输入用户名、邮箱、密码,创建了一个管理员账户,登录进入后,点击左下角有用户名头像那里,选择settings,可以修改语言显示。
再选择管理员面板。选择设置-外部链接。将ollama连接取消勾选,将openai连接这里的第一个默认的https://api.openai.com/v1取消勾选,并点击加号新增一个本地的llama server地址http://127.0.0.1:8080/v1,现在没有设置认证,所以认证方式为无。然后点一下刷新图标。发起新对话的时候就能看到本地的这个模型,并且可以对话,文字视觉都没问题。
如果没有显示本地模型,运行curl命令试试看是否llama server的连通有问题。
curl -s http://127.0.0.1:8080/v1/models | jq .

###正常的话会返回类似这样的结构体数据
{
  "models": [
    {
      "name": "models/Qwen3.5-4B-Q4_K_M.gguf",
      "model": "models/Qwen3.5-4B-Q4_K_M.gguf",
      "modified_at": "",
      "size": "",
      "digest": "",
      "type": "model",
      "description": "",
      "tags": [
        ""
      ],
      "capabilities": [
        "completion",
        "multimodal"
      ],
      "parameters": "",
      "details": {
        "parent_model": "",
        "format": "gguf",
        "family": "",
        "families": [
          ""
        ],
        "parameter_size": "",
        "quantization_level": ""
      }
    }
  ],
  "object": "list",
  "data": [
    {
      "id": "models/Qwen3.5-4B-Q4_K_M.gguf",
      "aliases": [
        "models/Qwen3.5-4B-Q4_K_M.gguf"
      ],
      "tags": [],
      "object": "model",
      "created": 1783826078,
      "owned_by": "llamacpp",
      "meta": {
        "vocab_type": 2,
        "n_vocab": 248320,
        "n_ctx": 8192,
        "n_ctx_train": 262144,
        "n_embd": 2560,
        "n_params": 4205751296,
        "size": 2729969664,
        "ftype": "Q4_K - Medium"
      }
    }
  ]
}
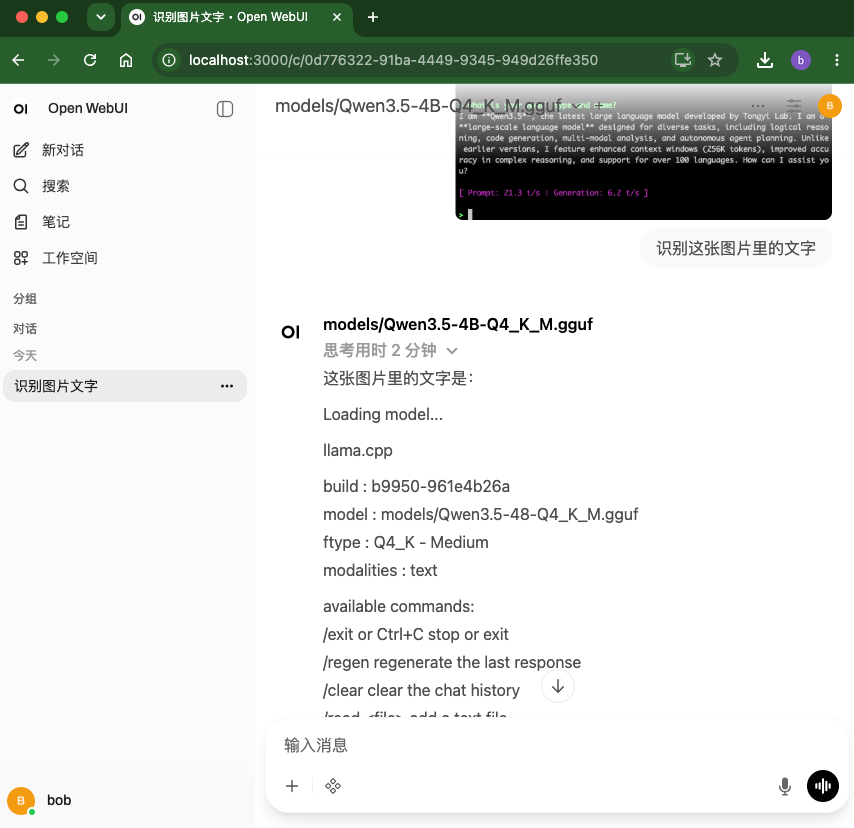
不过现在运行这两个命令并不算稳定,有几种做法。
一是用nohup放到后台去,不会随着命令行的消失就退出了。
二是使用systemctl来监视守护这两个进程,mac上用launchd。
# 新增llama server的systemctl配置
# /etc/systemd/system/llama-server.service
[Unit]
Description=Llama.cpp Server
After=network.target

[Service]
Type=simple
# 注意替换为你实际的路径和用户名
User=your_username
WorkingDirectory=/home/your_username/llama.cpp
# 重点:这里端口改为 8081,绑定 127.0.0.1
ExecStart=llama-server -m models/Qwen3.5-4B-Q4_K_M.gguf --mmproj models/mmproj-BF16.gguf --host 127.0.0.1 --port 8080 -c 8192 -t 4 --jinja --cache-type-k q8_0 --cache-type-v q8_0 --alias qwen3.5-4b
# 崩溃后自动重启
Restart=always
RestartSec=3

[Install]
WantedBy=multi-user.target
# 新增open-webui的systemctl配置
# /etc/systemd/system/open-webui.service
[Unit]
Description=Open WebUI Service
After=network.target llama-server.service
# 加上依赖,等 llama-server 启动后再启动
Requires=llama-server.service

[Service]
Type=simple
User=your_username
# 指定数据存储目录,防止乱放
Environment=DATA_DIR=/home/your_username/open-webui/data
Environment=HF_ENDPOINT=https://hf-mirror.com
# 使用虚拟环境中的绝对路径启动
ExecStart=/home/your_username/open-webui/venv/bin/open-webui serve --port 3000 --host 127.0.0.1
Restart=always
RestartSec=3

[Install]
WantedBy=multi-user.target
mac上的launchd也是类似的思路。
另外,llama server是一个http server,open-webui也可以配置uvicorn,那么现在还可以再nginx上配置,以便其他人访问。llama server也只监听127.0.0.1而不是0.0.0.0,防止外部直接调用。
# nginx的部分配置
server {
    listen 80;
    server_name localhost;

    # 代理 Open WebUI 的前端界面和 API
    location / {
        proxy_pass http://127.0.0.1:3000 ;
        proxy_set_header Host $host;
        proxy_set_header X-Real-IP $remote_addr;
        proxy_set_header X-Forwarded-For $proxy_add_x_forwarded_for;
        proxy_set_header X-Forwarded-Proto $scheme;

        # 重要:支持流式输出,防止大模型回答卡顿
        proxy_buffering off;
        proxy_read_timeout 300s;
        proxy_write_timeout 300s;
    }
}
一切启动后检查进程是否存在,是否能用localhost 3000打开页面进行对话, 是否能用本机ip打开页面进行对话。
另外持久化存储是个比较重要的点,llama-cli 和 llama-server 没有持久化存储,它们是无状态的纯计算引擎。当关闭它们时:模型权重从内存(RAM)中卸载。上下文窗口(KV Cache)瞬间清空。聊过的天、设置过的参数,全没了。总不能即用即销吧。
正好现在用到的open-webui就支持持久化存储,在上面的open-webui的systemd的配置中就指定了存储目录DATA_DIR。如果是本地运行serve命令时,在python虚拟环境中open-webui这个包的文件夹下有个data目录,webui.db就是存储的文件。当然指定到具体的位置是最好的。运行命令时也可以通过DATA_DIR参数来指定存储位置。
DATA_DIR=/Downloads/openwebui/data open-webui serve --port 300
webui.db是sqlite,也可以用其他db,不过我还没这个需要就先采用默认的吧。在界面上可以导出为json、txt、pdf。
既然llama server是个http server,而且性能也不错,毕竟是c++做的,好像是cpp-httplib记不住了。那么就可以用任意语言调用api来使用模型了。
可以用openai这个包。
先进行单轮问答:
from openai import OpenAI

client = OpenAI(
    base_url="http://127.0.0.1:8080/v1" ,   # 直连 llama-server
    api_key="not-needed",
)

response = client.chat.completions.create(
    model="models/Qwen3.5-4B-Q4_K_M.gguf",      # 必须和 --alias 一致
    messages=[{"role": "user", "content": "用三句话解释 RAG。"}],
    temperature=0.7,
    max_tokens=512,
)
print(response)

# 会返回很多信息包含推理,可以按需拿取
# ChatCompletion(id='chatcmpl-ao8F05mP2vh0Ffov40OEQWP6frB1kFss', choices=[Choice(finish_reason='length', index=0, logprobs=None, message=ChatCompletionMessage(content='', refusal=None, role='assistant', annotations=None, audio=None, function_call=None, tool_calls=None, reasoning_content="Thinking Process:\n\n1.  **Analyze the Request:**\n    *   Topic: RAG (Retrieval-Augmented Generation, 检索增强生成).\n    *   Constraint: Explain it in exactly three sentences (用三句话解释).\n    *   Language: Chinese (implied by the prompt).\n\n2.  **Identify Key Concepts of RAG:**\n    *   What is it? A technique combining retrieval and generation.\n    *   How does it work? Retrieve relevant information from an external source (database/knowledge base) -> Feed it to a large language model (LLM).\n    *   Why use it? To improve accuracy, reduce hallucinations, keep models updated with external knowledge.\n\n3.  **Drafting Sentences (Iterative Process):**\n\n    *   *Attempt 1:*\n        RAG 是一种将检索外部知识库与生成式人工智能模型相结合的技术。它首先检索与问题相关的文档信息,然后把这些信息输入给大语言模型进行处理。这样做可以让 AI 在回答时更准确,减少幻觉。\n        (Critique: Good, but maybe a bit generic. Let's check sentence count. 1, 2, 3. Looks okay.)\n\n    *   *Attempt 2 (Focusing on structure):*\n        RAG 是一种通过检索外部数据来增强语言模型生成能力的技术。它先根据用户问题从知识库中提取相关信息,再将这些信息作为上下文输入给模型。这种方法能有效提升回答的准确性和可靠性,同时降低模型“幻觉”的风险。\n        (Critique: Clear and concise. 3 sentences.)\n\n    *   *Attempt 3 (Refining for flow and impact):*\n        RAG(检索增强生成)是一种结合外部知识库与大语言模型的技术。它先检索与问题相关的信息,再将其作为上下文输入给模型进行回答。这种方法不仅能提高回答的准确性和时效性,还能有效减少模型的幻觉问题。\n        (Critique: Very standard definition. 3 sentences.)\n\n4.  **Selecting the Best Version:**\n    Attempt 3 is balanced. Let's polish it slightly to ensure it's exactly three distinct sentences.\n\n    Sentence 1: Definition/Concept.\n    Sentence 2: Mechanism/Process.\n    Sentence 3: Benefit/Value.\n\n    *Draft:*\n    RAG(检索增强生成)是一种结合外部知识库与大语言模型的技术。它先检索与"))], created=1783831947, model='models/Qwen3.5-4B-Q4_K_M.gguf', object='chat.completion', moderation=None, service_tier=None, system_fingerprint='b9950-961e4b26a', usage=CompletionUsage(completion_tokens=512, prompt_tokens=17, total_tokens=529, completion_tokens_details=None, prompt_tokens_details=PromptTokensDetails(audio_tokens=None, cache_write_tokens=None, cached_tokens=13)), timings={'cache_n': 13, 'prompt_n': 4, 'prompt_ms': 267.949, 'prompt_per_token_ms': 66.98725, 'prompt_per_second': 14.928213951162347, 'predicted_n': 512, 'predicted_ms': 102615.342, 'predicted_per_token_ms': 200.42058984375, 'predicted_per_second': 4.989507319480551})
可以用流式输出,从界面上看的话就是打字机效果
from openai import OpenAI

client = OpenAI(
    base_url="http://127.0.0.1:8080/v1" ,   # 直连 llama-server
    api_key="not-needed",
)

stream = client.chat.completions.create(
    model="models/Qwen3.5-4B-Q4_K_M.gguf",
    messages=[{"role": "user", "content": "写一首关于夏天的诗"}],
    stream=True,          # 关键
)
for chunk in stream:
    delta = chunk.choices[0].delta.content
    if delta:
        print(delta, end="", flush=True)

# 返回了诗,比我写得好
# 《夏的纹理》
#
# 太阳是金色的熔炉
# 把日子烤得微微卷边
# 风从树梢穿过时
# 带着一丝不易察觉的咸味
# 那是汗水蒸发后的余温
#
# 蝉鸣不知疲倦
# 把正午的寂静
# 唱得支离破碎
# 偶尔,一道闪电撕开云幕
# 雷声是天空突然的叹息
# 紧接着,暴雨倾盆而下
# 洗刷着城市的灰尘
# 也洗亮了空气中的尘埃
#
# 在这个季节里
# 西瓜最甜,冰棍最凉
# 我们躲在树荫下
# 把影子缩得小小的
# 汗水滴落,在地板上
# 晕开一圈圈白色的盐
#
# 直到夜色像墨汁般晕染开来
# 萤火虫提着小灯笼
# 在草丛里寻找归宿
# 夏夜是一场漫长的梦
# 梦里没有燥热
# 只有月光
# 轻轻吻过窗棂的褶皱
# 把白日的喧嚣,都藏进了
# 风铃摇动的声响里
可以多轮输出,就是有历史记录的那种,有前后文
from openai import OpenAI

client = OpenAI(
    base_url="http://127.0.0.1:8080/v1" ,   # 直连 llama-server
    api_key="not-needed",
)

history = [{"role": "system", "content": "你是简洁助手。"}]

def chat(user_input):
    history.append({"role": "user", "content": user_input})
    resp = client.chat.completions.create(
        model="models/Qwen3.5-4B-Q4_K_M.gguf", messages=history, max_tokens=256,
    )
    reply = resp.choices[0].message.content
    history.append({"role": "assistant", "content": reply})
    return reply

chat("我叫张三")
print(chat("我叫什么?"))   # 测试上下文记忆

# 返回了名字
# 你叫张三。
可以直接用requests库
import requests, json

def chat(messages, model="models/Qwen3.5-4B-Q4_K_M.gguf"):
    resp = requests.post(
        "http://127.0.0.1:8080/v1/chat/completions",
        json={"model": model, "messages": messages, "temperature": 0.7},
        timeout=120,
    )
    resp.raise_for_status()
    return resp.json()

# 流式
def chat_stream(messages, model="models/Qwen3.5-4B-Q4_K_M.gguf"):
    with requests.post(
        "http://127.0.0.1:8080/v1/chat/completions",
        json={"model": model, "messages": messages, "stream": True},
        stream=True, timeout=120,
    ) as resp:
        for line in resp.iter_lines():
            if line and line.startswith(b"data: "):
                data = line[6:]
                if data == b"[DONE]":
                    break
                chunk = json.loads(data)
                if "content" in chunk["choices"][0].delta:
                    yield chunk["choices"][0].delta.content
也可以通过open-webui请求,说的是当需要RAG时,我没做这方面的尝试。
文章评论 (1)
有显卡的windows主机的一些操作,后面再来更新